The QN8035 is a stereo FM radio receiver launched by the Quintic Corporation. Compared to other popular digital FM tuners (RDA5807, TEA5767, etc.), this tuner does not seem to be as popular among the DIY community. As we have seen, the biggest problem with this IC is the lack of information. During our initial search, we came across some details about this IC. Much of that information was confined to a product datasheet and a few undocumented GIT repositories.
Based on the information we found on the internet, we concluded that Quintic was no longer in business. According to the NXP website, it stated that Quintic Corporation was acquired by NXP in 2015.
Although the Quintic is no longer in business, the QN8035 IC can still be purchase at a low price from online stores. In addition, we found several FM radio kits manufactured using this IC in online stores.
Due to the lack of information, I decided to explore this IC to understand its functionality and limitations. In this article, I will describe my test setup and software applications built around this IC. After a few days of testing, I construct a fully functioning Raspberry Pi 3 based FM radio receiver using this IC.
The core components of this radio receiver are the QN8035 tuner and 32.768kHz oscillator. This entire radio design is to be powered by a 3.3V power supply. In our prototype, we drive this radio receiver using 3.3V supply terminals provided on the Raspberry Pi board.
 |
| QN8035 Tuner PCB. |
The I2C bus has been used to interface the Raspberry Pi and QN8035 tuner IC. On Raspberry Pi, the I2C pull-ups are not necessary with this module. For other development boards, please check the pull-up resistor requirement from the documentation/schematic.
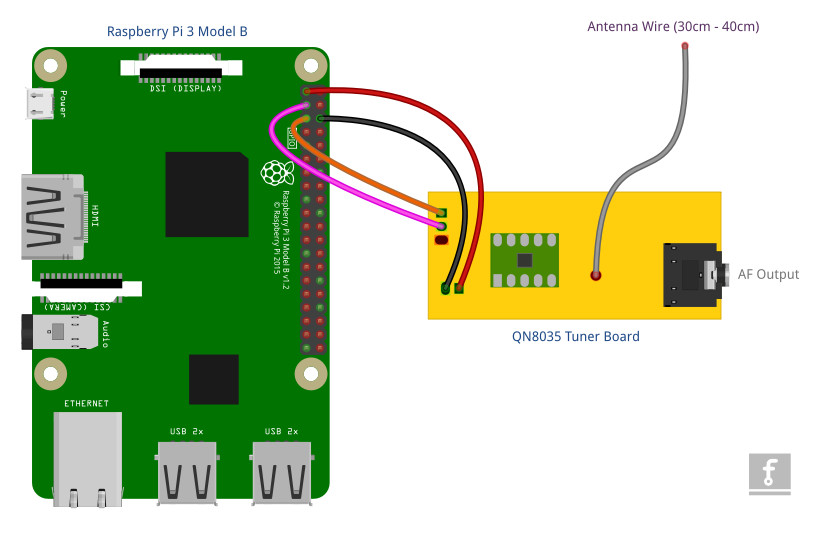 |
| QN8035 and Raspberry Pi 3 connection diagram. |
Initially, we developed a simple console application to test this tuner. This application and its source code are available at github.com/dilshan/qn8035-rpi-fm-radio. Binary executable compiled for the 32-bit Raspberry Pi operating system can also be downloaded in the release section of the above repository.
The terminal application is written using GCC and WiringPi library. Be sure to enable I2C support on Raspberry Pi using the "raspi-config" tool before testing this application.
 |
| GTK FM Tuner application. |
After testing the QN8035 with the above application, we developed a GUI tuner application using GTK. This application provides all the features provided in the console application and which includes:
- Manual and automatic station scanning.
- Decode RDS PS (program service) data.
- Volume control.
- Display RSSI and SNR readings receive from the tuner.
Both these GUI and terminal applications have the RDS PS decoder to display the program/service name. As we have observed, the QN8035 RDS registers populate if it receives strong signals only. In some weak points, we observed that the RDS buffer received lots of incorrect data.
In setting up our tests, we used a 30cm long wire antenna with this radio receiver and received extremely stable reception. With a proper FM antenna, we got all the stations in the FM broadcast spectrum and were able to capture almost 95% of the channels and RDS data without any problems.
 |
| QN8035 tuner board with Raspberry Pi 3. |
One of the significant shortcomings we saw in the QN8035 compared to the RDS5807M was its poor sensitivity to RDS data. Compared to the RDS5807M, this receiver does not decode RDS data in many weak stations.
The second significant drawback is the software complexity of the automated scanner (CCA) function. Compared to other digital tuners, we need to maintain a few states and values to perform the automatic scanning process on the QN8035.
We designed this receiver on a single-side PCB to minimize soldering inconvenience. The dimensions of the PCB are 58mm × 26.75mm.
The complete construction and configuration steps of this tuner are shown in the video presented in this article.
This is an open-source hardware project. All schematics, design files, and PCB layouts have been released under the Creative Commons Attribution 4.0 International license. Both test application and GTK FM Tuner application are released under the terms of the MIT License.
Comments